

Step 3: Building the Blueprints – The Block View (Part Definitions)
In the previous step, we defined the “Mission”—what the system is required to do. Now, we move into the Block View (known in SysML v2 as Part Definitions). This is where we create the blueprints for the physical or logical hardware that will make our system a reality.
In SysML v2, we follow a rigorous Definition and Usage pattern. Think of a Definition as a cookie cutter (the blueprint) and a Usage as the actual cookie (the object in a specific context). In this step, we are focusing on creating the cookie cutters.
1. Part Definitions: The Modular Units
A part def (Part Definition) represents a modular unit of structure. It is the base type for things like sensors, controllers, valves, or even entire houses. A part definition is “clean”—it describes a kind of thing without specifying where it is used yet.
Key Features of a Part Definition:
- Attributes: These represent the qualities, states, or characteristics of the part, such as
mass,powerDraw, or a temperaturereading. - Ports: These are the standardized “connection points.” They define exactly how a part interacts with the outside world (like a USB port, a water pipe, or a data stream).
2. Attributes and Strictly Typed Data
As we saw in Step 2, SysML v2 is strictly typed. When we give a sensor a reading attribute, we don’t just call it a “number.” We tell the model it is a ThermodynamicTemperatureValue. This ensures that you cannot accidentally connect a temperature sensor to a pressure valve—the model will reject it because the types don’t match.
You may also see the symbol :> used for Specialization. For example, attribute reading :> ThermodynamicTemperatureValue means: “The reading is a specialized version of a temperature value,” allowing you to add further constraints to it if needed.
3. Ports: The Plugs and Sockets
Ports define what can be exchanged between parts. In SysML v1, you needed complex “Interface Blocks” to manage this. In SysML v2, ports are much simpler and more intuitive. You define a port def (a blueprint for a connection point) and then reuse it across different parts.
The Conjugation Symbol (~): This is a vital SysML v2 construct. If you have a DataPort definition that sends data Out, you often need a corresponding port to receive data In. Instead of writing a whole new definition for the input, you use the tilde ~ to conjugate the port. This effectively “flips” the direction of the flow, turning an Output port into an Input port instantly.
4. Architectural Principle: Modular Modeling & Namespace Expansion
Before we write code, it is important to understand where we are writing it. In SysML v2, manually re-writing or copy-pasting code is not the standard way to handle already-defined data. Instead, we rely on Namespaces.
In this step, we are expanding the same ClimateDefinitions package we started in Step 2. Because everything resides inside the same curly braces {}, the new parts (Sensor, Controller) and the old parts (Requirement, Actor) are already members of the same namespace.
The Rule: You do not need to re-define or import elements that are already in the same package. They are automatically “visible” to each other because they live in the same container. This keeps your model clean and interconnected.
Hands-On: Expanding ClimateDefinitions.sysml
We will now add the detailed blueprints for our Sensor and Controller to the file we created in Step 2. Keep your ClimateDefinitions.sysml file open.
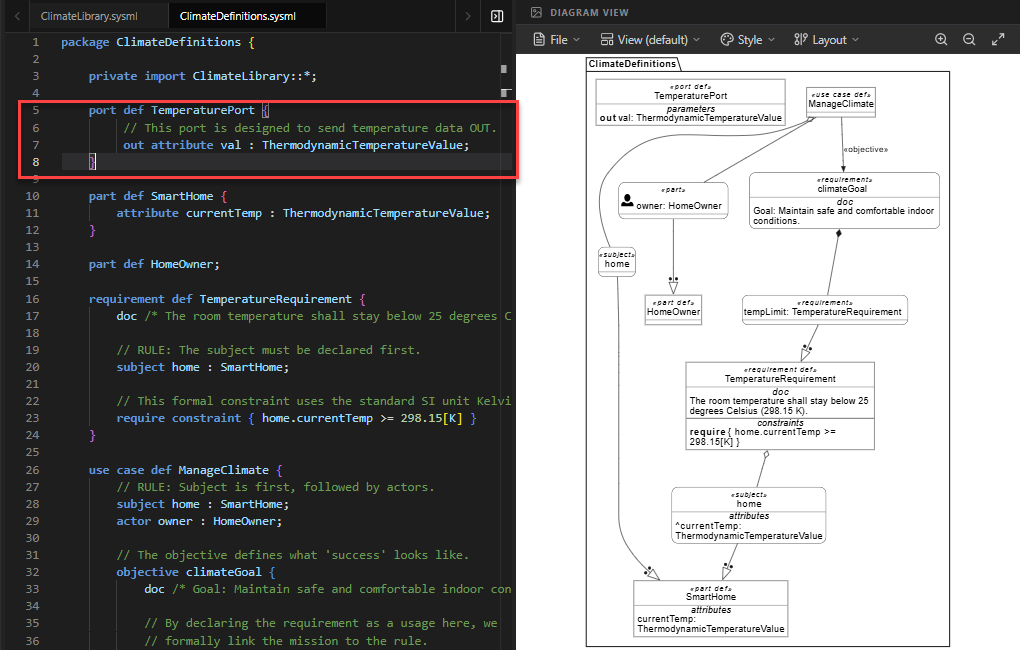
- Define the Port Blueprint (
TemperaturePort): First, we need a standard way for components to share temperature data. We define aport def. Inside, we declare anout attributenamedval. This means any part using this port will send temperature data out through it.port def TemperaturePort { // This port is designed to send temperature data OUT. out attribute val : ThermodynamicTemperatureValue; }Why this matters: By defining this once, we ensure that both the Sensor and the Controller speak the same “language” when they connect.
- Define the Sensor Blueprint (
Sensor): Next, we define theSensorpart. It has two key features:- Attribute:
readingstores the current temperature value locally. - Port:
tempOutuses ourTemperaturePortdefinition. This allows the sensor to broadcast its reading to other parts.
part def Sensor { doc /* A generic sensor that reads temperature. */ // Characteristic of the sensor attribute reading : ThermodynamicTemperatureValue; // The connection point using our blueprint above port tempOut : TemperaturePort; }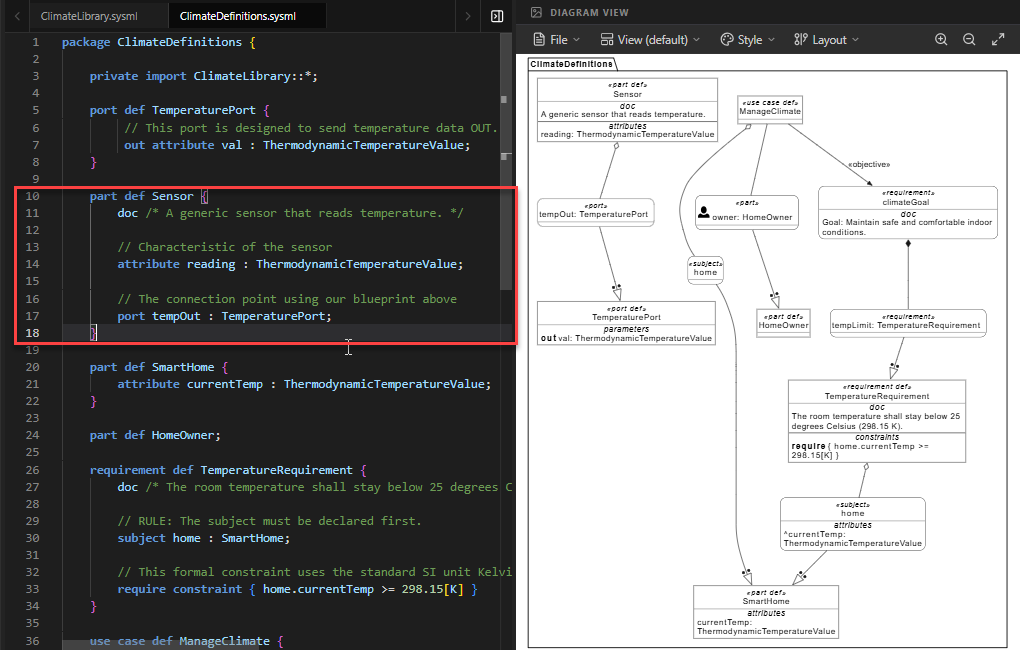
- Attribute:
- Define the Controller Blueprint (
Controller): The Controller is the “brain.” It needs to receive data, not just send it. Here we see the power of conjugation:- Attribute:
setPointdefines the target temperature (defaulted to 21°C / 294.15K). - Port:
tempIn : ~TemperaturePort. Notice the~(tilde). This tells SysML v2 to take theTemperaturePort(which is normally an Output) and flip it to become an Input. This allows the Controller to accept data from the Sensor.
part def Controller { doc /* The logic unit that processes data and decides actions. */ // The 'target' temperature the user wants to maintain attribute setPoint : ThermodynamicTemperatureValue = 294.15[K]; // 21 degC // The input port. We use ~ (tilde) to flip the TemperaturePort // from an 'out' port to an 'in' port. port tempIn : ~TemperaturePort; }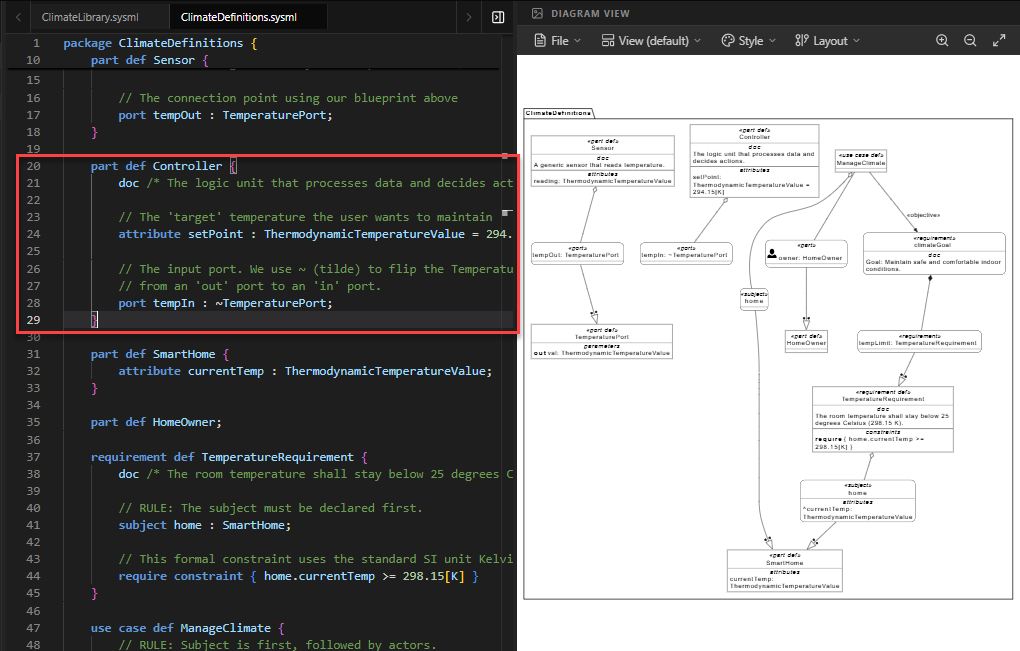
- Attribute:
- Update the Subject (
SmartHome): We previously definedSmartHomewith just a temperature attribute. Now that we have blueprints for Sensors and Controllers, we acknowledge that the Smart Home will eventually contain these parts. We leave the body empty for now, as we will define the specific usages (instances) of these parts in Step 4.part def SmartHome { attribute currentTemp : ThermodynamicTemperatureValue; // We will add the internal parts (usages) in the next step! } - Verify Existing Elements: Ensure that your
HomeOwner,TemperatureRequirement, andManageClimateuse case (from Step 2) remain at the bottom of the file. Since they are in the same package, they can now reference the newSmartHomestructure if needed.
Full Code for Step 3
package ClimateDefinitions {
private import ClimateLibrary::*;
// ---------------------------------------------------------
// 1. PORT DEFINITION (The "Socket" blueprint)
// ---------------------------------------------------------
port def TemperaturePort {
    // This port is designed to send temperature data OUT.
    out attribute val : ThermodynamicTemperatureValue;
}
// ---------------------------------------------------------
// 2. SENSOR BLUEPRINT
// ---------------------------------------------------------
part def Sensor {
    doc /* A generic sensor that reads temperature. */

    // Characteristic of the sensor
    attribute reading : ThermodynamicTemperatureValue;

    // The connection point using our blueprint above
    port tempOut : TemperaturePort;
}
// ---------------------------------------------------------
// 3. CONTROLLER BLUEPRINT
// ---------------------------------------------------------
part def Controller {
    doc /* The logic unit that processes data and decides actions. */

    // The 'target' temperature the user wants to maintain
    attribute setPoint : ThermodynamicTemperatureValue = 294.15[K]; // 21 degC

    // The input port. We use ~ (tilde) to flip the TemperaturePort
    // from an 'out' port to an 'in' port.
    port tempIn : ~TemperaturePort;
}
// ---------------------------------------------------------
// 4. UPDATED SUBJECT DEFINITION
// ---------------------------------------------------------
part def SmartHome {
    attribute currentTemp : ThermodynamicTemperatureValue;

    // We will add the internal parts (usages) in the next step!
}
// ---------------------------------------------------------
// 5. EXISTING ELEMENTS FROM STEP 2
// ---------------------------------------------------------
part def HomeOwner;
requirement def TemperatureRequirement {
subject home : SmartHome;
require constraint { home.currentTemp <= 298.15[K] }
}
use case def ManageClimate {
subject home : SmartHome;
actor owner : HomeOwner;
objective climateGoal {
requirement tempLimit : TemperatureRequirement;
}
}
}Summary of SysML Elements Used
The table below summarizes the new SysML v2 elements introduced in this step, their purpose, and how they appear in the code.
| SysML Element | Purpose | Code Context |
|---|---|---|
port def |
Defines a reusable blueprint for a connection point (interface) between parts. | port def TemperaturePort { ... } defines how temperature data is exchanged. |
out attribute |
Declares a data flow exiting a port. It specifies what information is being sent. | out attribute val : ThermodynamicTemperatureValue; inside the port definition. |
part def |
Defines the structural blueprint of a system component (e.g., a Sensor or Controller). | part def Sensor { ... } and part def Controller { ... }. |
port [name] : [Type] |
Instantiates a port on a part using a specific port definition. | port tempOut : TemperaturePort; adds an output port to the Sensor. |
~ (Conjugation) |
Flips the direction of a port (e.g., from Output to Input) without creating a new definition. | port tempIn : ~TemperaturePort; makes the Controller’s port an input. |
= (Default Value) |
Assigns a default initial value to an attribute. | attribute setPoint : ... = 294.15[K]; sets the default target temperature. |
Conclusion
In this step, you have moved from abstract requirements to concrete structural blueprints. You learned how to define Part Definitions for your system’s components and how to use Ports to standardize how they communicate. Crucially, you mastered the concept of Conjugation (~), which allows you to easily reverse data flow directions, and you understood how Namespace Expansion allows you to build upon your previous work without redundant imports.
Your ClimateDefinitions file now contains both the “Mission” (Requirements/Use Cases) and the “Blueprints” (Parts/Ports). However, these blueprints are still just definitions—they don’t actually exist in the system yet. In Step 4, we will learn how to create Usages—instantiating these blueprints inside the SmartHome to build the actual system architecture.
Ready to Model Your Own Systems?
Stop drawing static diagrams. Start building intelligent, verifiable models with SysML v2 Studio. Experience the power of the Digital Thread today.
