

Step 1: Building the Foundation – Packages, Namespaces, and Libraries
Welcome to the first step of your SysML v2 journey. Before we can model complex sensors, control logic, or physical interactions, we must establish a robust workspace. In SysML v1, you might have been used to dragging “Packages” onto a diagram as simple containers. In SysML v2, the Package remains the fundamental unit of organization, but it is now a strictly defined Namespace that governs how your model elements find, reference, and interact with each other.
Think of this step as setting up the “dictionary” and “grammar” for your system. Without these definitions, the modeling tool wouldn’t know what a “degree Celsius” is, nor would it understand the difference between a temperature sensor and a safety protocol.
1. What is a Package?
A package is a specialized kind of namespace used solely as a container to organize your model elements. Think of it as a folder on your computer, but with a critical difference: it defines a semantic boundary. Every element inside that package must have a unique name within that context, preventing naming collisions when you combine different parts of a large system.
The Syntax:
package ClimateLibrary {
    /* Elements go here */
}
In the textual notation (the code view), a package is declared using the keyword package followed by its name and a body enclosed in curly braces {}. This structure allows you to modularize your system, keeping related definitions together.
2. Visibility: Public vs. Private
When you put an element (like a unit definition or a custom type) inside a package, you must decide who else in the “digital thread” can see it. This is called Visibility. Controlling visibility is crucial for creating clean, reusable libraries.
- Public (Default): If you don’t specify, elements are public. They can be seen and used by any other package that imports your library. This is ideal for shared resources like units or standard interfaces.
- Private: By placing the
privatekeyword before an element, you “hide” it. It is visible to sub-packages inside your library but invisible to the outside world. This helps encapsulate internal logic that users of your library shouldn’t tamper with.
For our ClimateLibrary, we will use public imports and definitions because we want our units and math rules to be available to every other part of our smart home model.
3. The Power of Imports
One of the biggest shifts from SysML v1 to v2 is that the language no longer “assumes” you know what a number or a unit is. If you want to use a Real number, a Boolean truth value, or a Celsius degree, you must formally import the library that defines them.
An import relationship allows one namespace to access memberships from another without needing to use “qualified names” (long paths like SI::Units::Celsius) every time. It keeps your code clean and readable.
Types of Imports:
- Member Import:
import ISQ::temperature;— Brings in only one specific element. Useful for precision. - Namespace Import (
*):import ISQ::*;— Brings in every visible element from that package. This is the most common approach for standard libraries. - Recursive Import (
**):import ISQ::**;— Brings in every element from that package AND all its sub-packages. Use this when dealing with deeply nested libraries.
4. Standard Model Libraries
SysML v2 includes several built-in Domain Libraries that provide the “vocabulary” for systems engineering. These are pre-defined packages that you don’t need to write yourself. For our Smart Home system, we need three essentials:
- ScalarValues: Defines primitive data types like
Real(decimal numbers),Boolean(true/false),Integer, andString. You need this for any basic logic or data storage. - ISQ (International System of Quantities): Defines the physical qualities we measure, such as
temperature,mass,length, ortime. This ensures that when you say “temperature,” the model knows it’s a physical quantity, not just a number. - SI (International System of Units): Defines the measurement units we use, like
[degC]for Celsius,[K]for Kelvin, or[kg]for kilograms. This allows for unit-aware calculations and conversions.
5. Annotations: Comments and Documentation
As you build your model, you need to leave notes for yourself and your team. SysML v2 distinguishes between two types of notes, serving different purposes:
- Comments (
/* ... */): These are part of the model structure but are purely for human readers. They can be named or attached to specific elements. They are great for temporary notes or explaining complex logic. - Documentation (
doc): This is a distinguished kind of comment used to formally document the element that owns it. Tools often extractdoctags to generate formal reports, requirement documents, or user manuals. It is the “official” explanation of an element.
Hands-On: Creating your ClimateLibrary.sysml
Now, let’s apply these concepts. We are creating a modular library that will store our shared math, units, and a custom “Safety” tag. This file will be the “Source of Truth” for all physical data in our tutorial. By centralizing these definitions, we ensure that if we ever need to change a unit or a safety rule, we only do it in one place.
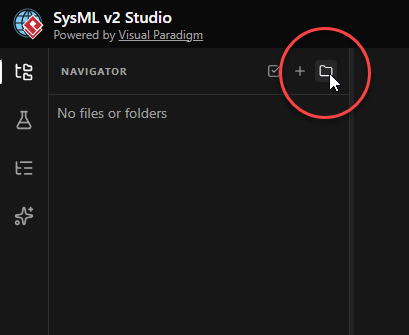
- Create the Project Folder: First, we need a place to store our files. In the Navigator pane (usually on the left), click on New Folder.

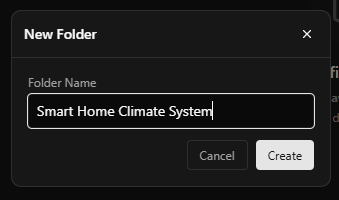
- Name the Folder: Enter Smart Home Climate System as the folder name and click Create. This folder will act as the root package for our entire project.

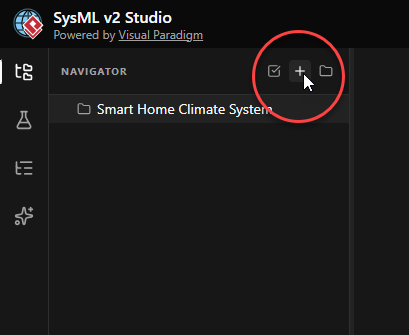
- Verify Folder Creation: This creates a new folder Smart Home Climate System in the Navigator pane. Throughout this tutorial, we will create and keep all our
.sysmlfiles under this folder to maintain organization. - Create the Library File: Let’s create the specific file for our library. Click on the folder you just created, then click on New File at the top right.

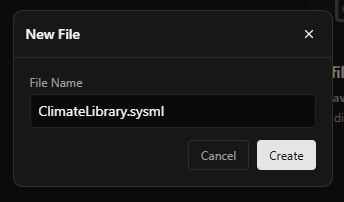
- Name the File: Enter
ClimateLibrary.sysmlas the filename, and click Create. The.sysmlextension tells the tool that this file contains SysML v2 textual models.
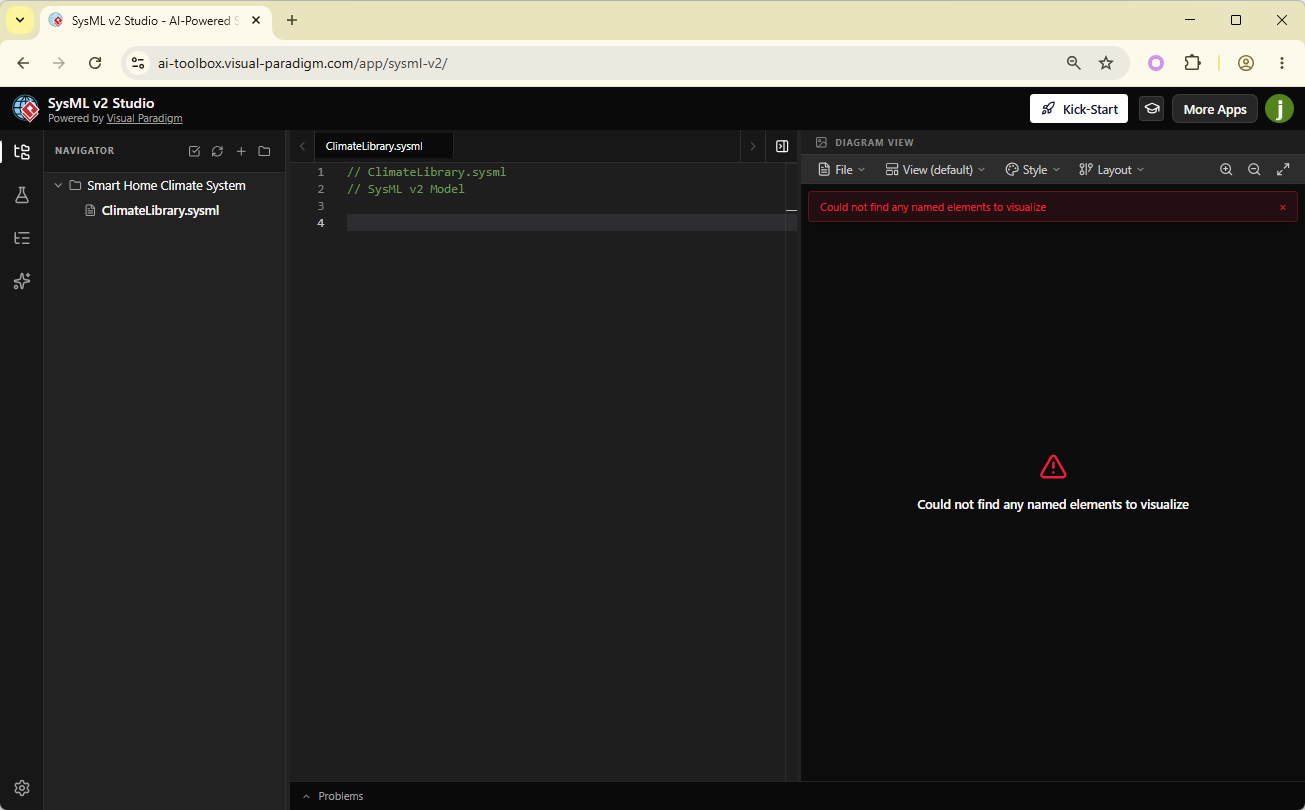
- Explore the Interface: This opens the code editor. On the right, you will see the Diagram Viewer, which visualizes the code in real-time. Right now, both the code editor and the diagram are empty. As you type, the diagram will update automatically, helping you verify the structure.

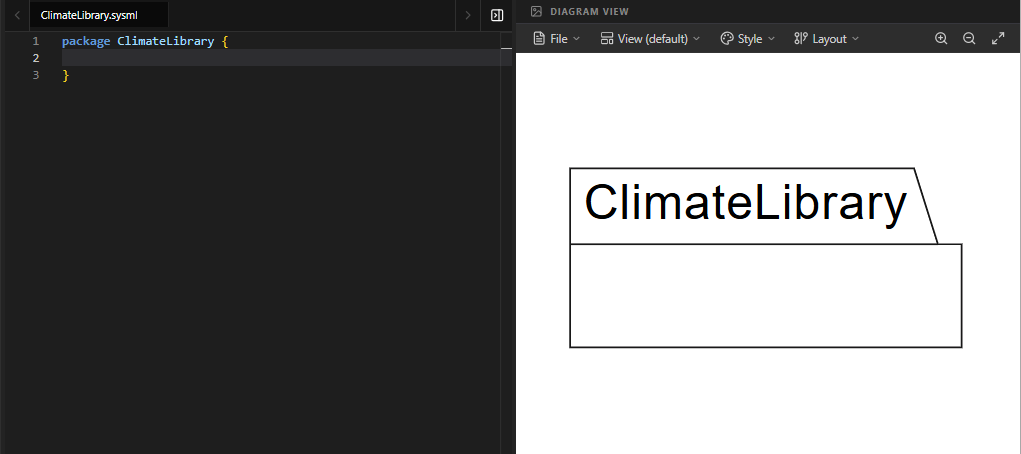
- Define the Package: Let’s start by defining the package namespace. Enter the code below into the code editor. This creates the container
ClimateLibrarythat will hold all our definitions.package ClimateLibrary { }You should see a package shape labeled “ClimateLibrary” appear in the diagram view.
- Import Standard Libraries: Now, we need to bring in the standard vocabulary. Enter the import statements inside the package definition. These lines allow us to use standard data types and physical units without writing their full paths.
    public import ScalarValues::*; // Gives us Real, Boolean, etc.
    public import ISQ::*;          // Gives us the 'temperature' quantity
    public import SI::*;           // Gives us the '[degC]' unit symbol
Code Explanation:
public import ScalarValues::*: Makes basic data types likeRealandBooleanavailable to anyone who uses this library.public import ISQ::*: Imports physical quantities. Now we can refer to “temperature” as a concept.public import SI::*: Imports units. Now we can use symbols like[degC]or[K].

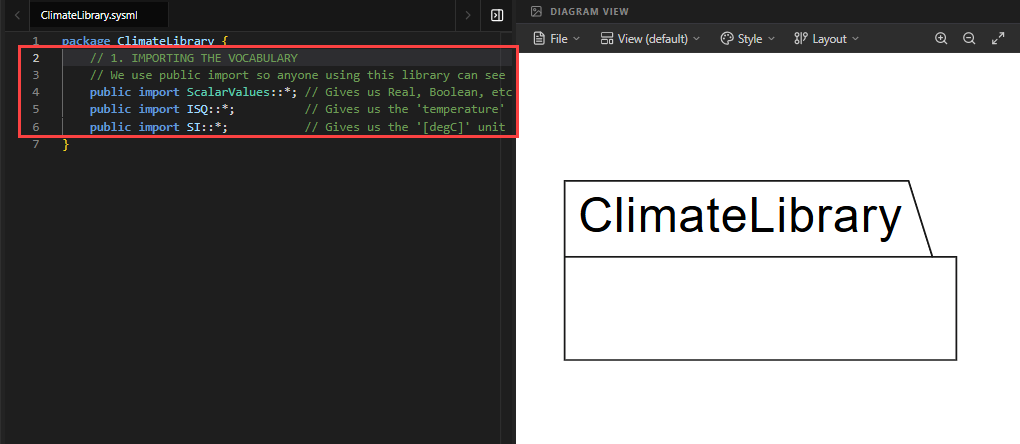
Note: The diagram view may remain unchanged for imports, as they are relationships rather than structural elements. This is normal.
- Define Custom Metadata: Under the import statements, we will define custom metadata. Metadata allows you to attach custom “tags” or properties to any model element. In this tutorial, we define a
Safetytag to identify components that are critical for home safety later on.public metadata def Safety { doc /* This metadata marks a component as critical for home safety. */ attribute isMandatory : Boolean; // Metadata can have its own data }Code Explanation:
metadata def Safety: Defines a new type of metadata named “Safety”.doc: Adds a formal description of what this tag means.attribute isMandatory : Boolean: Adds a property to the tag. When we apply this tag to a component, we can specify whether it istrueorfalsethat it is mandatory.


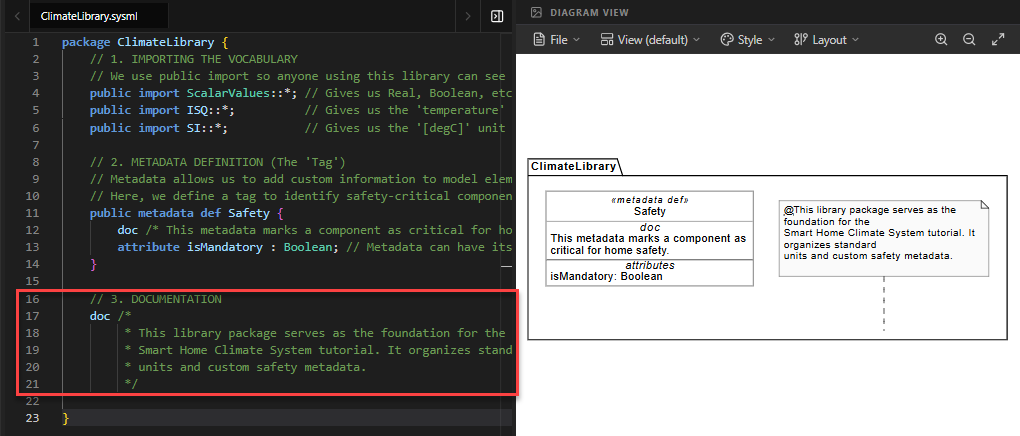
- Add Package Documentation: Finally, let’s add a formal documentation block to the package itself. This explains the purpose of the entire library to anyone who opens it.
doc /* * This library package serves as the foundation for the * Smart Home Climate System tutorial. It organizes standard * units and custom safety metadata. */Code Explanation: This
docblock is attached to theClimateLibrarypackage. It will appear in generated reports and help future engineers understand the intent of this file.
The Diagram View (A Brief Introduction)
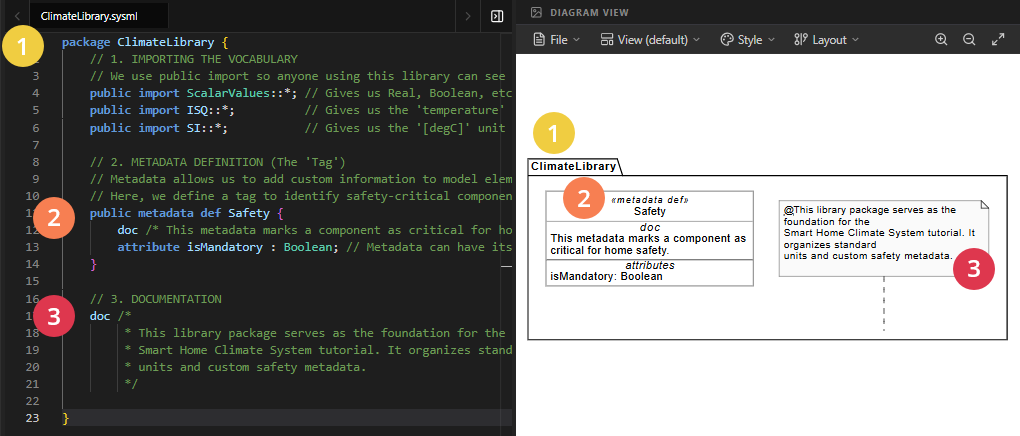
The diagram view provides you with a graphical representation of your code, helping you understand the logical structure easier. Different parts of the code are represented by different shapes:
- The Package definition is visualized as a large container shape labeled
ClimateLibrary. - The Metadata definition
Safetyis rendered as a block-like shape, showing its attributes. - The Documentation is rendered as a note attached to the package.

Full Code for Step 1
package ClimateLibrary {
// 1. IMPORTING THE VOCABULARY
// We use public import so anyone using this library can see these units.
public import ScalarValues::*; // Gives us Real, Boolean, etc.
public import ISQ::*; // Gives us the 'temperature' quantity
public import SI::*; // Gives us the '[degC]' unit symbol
// 2. METADATA DEFINITION (The 'Tag')
// Metadata allows us to add custom information to model elements.
// Here, we define a tag to identify safety-critical components later.
    public metadata def Safety {
        doc /* This metadata marks a component as critical for home safety. */
        attribute isMandatory : Boolean; // Metadata can have its own data
    }
// 3. DOCUMENTATION
    doc /*
     * This library package serves as the foundation for the
     * Smart Home Climate System tutorial. It organizes standard
     * units and custom safety metadata.
     */
}
Summary of SysML Elements Used
The table below summarizes the key SysML v2 elements introduced in this step, their purpose, and how they appear in the code.
| SysML Element | Purpose | Code Context |
|---|---|---|
package |
Defines a namespace to organize model elements and prevent naming conflicts. | package ClimateLibrary { ... } wraps all content. |
public import |
Brings external definitions into the current namespace, making them available to others. | public import ScalarValues::*; imports basic data types. |
metadata def |
Defines a custom “tag” or annotation type that can be applied to other model elements. | public metadata def Safety { ... } creates a safety tag. |
attribute |
Defines a property or data field within an element (like a metadata tag). | attribute isMandatory : Boolean; adds a true/false field to the Safety tag. |
doc |
Provides formal documentation for an element, used for reporting and clarity. | doc /* This library... */ explains the package’s purpose. |
Conclusion
In this step, you have successfully built the foundation for your Smart Home Climate System. You learned how to create a Package to organize your work, how to Import standard libraries to access physical units and data types, and how to extend SysML v2 with custom Metadata to suit your specific engineering needs.
By establishing this ClimateLibrary, you have created a reusable asset. Any future model that needs to talk about temperature or safety can simply import this library, ensuring consistency across your entire project. In Step 2, we will reference this library to define our high-level Requirements and Use Cases, turning these static definitions into active system goals.
Ready to Model Your Own Systems?
Stop drawing static diagrams. Start building intelligent, verifiable models with SysML v2 Studio. Experience the power of the Digital Thread today.
